Pinteresting Cardigan Upcycle

This is a project from last year that I loved! When I first saw the inspiration pin, I knew I had to have one!

THE PINSPIRATION:

I finally found where this came from - it's here - but they don't sell them anymore. 

I had a dark gray cardigan that was too boring and a lighter gray henley-type shirt that looked horrible on me. I liked the contrast. Cutting out appoximately 50 'flowers' was super fun (feeling the sarcasm?). Sewing them on was like spending time in a field full of flowers with no bees reading a great book.

As you can see from the photo below, just the flowers sewn on was not enough flair for me (NO sarcasm - I LOVE FLAIR!), so I then hand sewed every button into place.

Buttons or no buttons? Definitely Buttons! They tied the whole thing together!

Once it was finished (I did not count hours - I didn't care how long it took - I wanted this cardigan!), I couldn't keep it. It now required hand washing. So I gave it to my mom...I know she will take proper care of it.
(Yes, I did spend days making this and then refused to spend minutes washing it - sounds dumb when you put it like that. So shut it.)

This is my beautiful mother who made me promise to cut her head off in this picutre. 

She cut her own head off in this picture. 

Pinteresting Ice Sculptures, or How to Waste a Whole Day

Yesterday I revealed my Pinteresting Ice Sculptures for the Birds to Eat where I made some pretty cute bird feeders with some ice sculpture molds I found in my supplies (garage sales are awesome). That whole project happened so I could avoid cleaning my supply room. I stretched it out into 2.5 days of not cleaning my supply room (yay me!). But I did have to venture in there for a few more items...

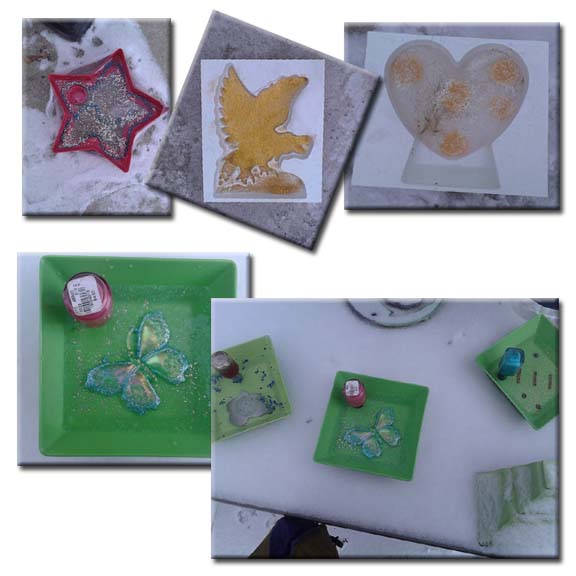
The fingernail polish was to make a hole for hanging. It only kind of worked...


Glitter, crayon shavings, ornaments, beads, food coloring, more molds...I ignored the mess while I looked for anything that would cool in ice.
Got all the molds filled in about 15 minutes. I spent the rest of the day adding layers and watching the water freeze. By evening, it was pretty obvious that I was going to have to wait until morning for solid blocks of ice. Probably could have had a more productive day...

I did, however, end up with these in the morning:


I'm glad I got to enjoy them today because it's supposed to warm up again tomorrow and then all we'll have are the memories...oh, and this blog post.

Have you made some ice sun catchers? Send me a pic!

Pinteresting Ice Sculptures for the Birds to Eat

I decided it was time to organize my craft/art supply area. I was 10 miserable minutes into this project when I came across these ice sculpture molds:


ICE SCULPTURES! Forget the organizing!

It's freezing outside, so I pinterested (yes, it's now a verb) 'ice bird feeders'. This was a nice one...if a bit plain for me (it's not a swan, now, is it?)...

The Pinspiration:

This photo came from a fun blog - check it out here.

I have leftover birdseed from a pine cone bird feeder adventure and water is readily available, so let his free project begin!
My daughter helped add the birdseed but lost interest when she had to put shoes on to go outside...so I added the water. THAT'S IT! I left them outside overnight and these were my rewards in the morning:

My Ice Bird Feeders:


Now THAT'S a freakin' swan!


They turned out great, but my inner mold-loving nerd was completely frustrated. I pinterested some more and came across this beauty:


A "Winter Sun Catcher" from another fun blog! Check it out here!

So back to the unorganized supply room...


I better make these a whole new blog post...it will be right here as soon as I write it.

Let's just say my mold itch is being scratched as the water turns to ice. It takes SO LONG when you make these during the day...because of all the watching water freeze that has to happen. Maybe if I stop adding layers they will freeze faster? Maybe.

Have you made a great ice bird feeder? Please send me pictures!

*Update* I just had to add these pictures my husband took of the squirrel enjoying the bird feeder. Or does that make it a squirrel feeder?


Pinteresting Guitar Shelf


This is one of my favorite projects of the year (yes, it's jan. 10th - what?)! I've had the 2nd pinspiration photo pinned for a while, but was lacking directions (could I have figured this out? maybe. maybe.). Then I found them!!

The Pinspiration: 


So I had the instructions...Pinterest told me the link might lead to something inappropriate so I discontinued the search. Inappropriate...no time now. :)

This was the original obsession-starter:

 I had to search (as usual) for the original post - it is a Chinese website (this one) which led me to a Chinese Pinterest-type page (here)...it was fun, but I digress...

LOVE IT! The colors are great! I tried really really hard to get away from these colors so I would feel less like I was copying (perception is everything). I knew I wanted the outside glossy black, so I went for the most Rock'n'Roll color there is -  purple (just ask Prince!). I had an awesome purple paint during present making time. It was so awesome I used most of it. The only good color I had plenty of  was a bluish-green color disturbingly similar to the one above. The choice was get over it or go to Michaels - at 5:00. I got over it.

My Rockin' Guitar Shelf:

Before:

It's been in my front yard for a year, waiting to become a planter. Plans change.

After: 

This is in my backyard, but I swear I'm taking it inside!

I'm so glad I got over it because I LOVE IT! And the colors aren't that similar (perception). After a call to my Mom when it looked like this and I was SO STUCK...


...I added sheet music (thanks, Mom!) to the inside and a red outline (thanks, Husband!). What's left of the sound hole got a decal that I 'borrowed' from Google images (you can search 'sound hole stickers' - it's safe:) ) and then added some of the blue color to it in Photoshop. I got super lucky printing - it fit perfectly the first time with no manipulation (that NEVER happens!). The shelves - which are made from the part of the guitar I cut out - are just glued in, so no heavy items on these shelves - but who cares???

Here are some other views:


Now I have to paint my walls to make this stand out a little more...It never ends.
Have You made a guitar shelf? I'd love to see it!

Pinteresting Felted Mug Warmer ('Coozie' if you are from Kansas)

During my upcycled-felted-wool phase, I ended up with lots of extra little bits. Off to Pinterest I went, in search of an inspiring idea to save those scraps from the trash. This isn't the original picture I found, but I love these heart buttons and it's simplicity...

The Pinspiration:

Thank You, The White Bench, for this lovely photo!

So I went a completely different direction:

My Felted Wool Coozie (Mug Warmer, whatever):

That's not a mug. Doesn't change the Coozie-ness of my Coozie.
Because of the plethora of buttons in my possession, I made a mandala on my Coozie. I love these colors together. I should dig this out and use it... 


I found it! It's so pretty! I put it on my mug. It slides down and I remember why I took the original photo on a glass.  I need my less tapered mug, which is growing something really awesome and science-y in my car. 

I used velcro to close it. It's pretty stretchy fabric for felted wool (damn 10% acrylic), so it can fit different sized (not tapered) mugs. Yay me! 


Time Requirements: 10 minutes or all day.

Materials Requirements: Felted wool scraps, embellishments (or not), some kind of closure.

Skill requirements: Cutting, possible button application, maybe some sewing (sew on the velcro - it won't last with the sticky kind).

ARE YOU PINSPIRED?


Got 10 Minutes? Print Pictures on Book Pages!


So tearing pages out of books isn't really my thing. I LOVE books! But a friend recently SPENT MONEY on something similar so I had to prove it could be done for free. I did. And I did it with the 1964 dictionary that we used to play scrabble with. It really is outdated and now will be useful for other things...

The Pinspiration:

This beautiful photo comes from this cool blog.

After 2 failed attempts:


I decided to use pictures of my own family:
At least now I like them. I chose specific dictionary pages, too, but no one will notice that but me. Now to find frames...I don't have any that are that exact size, but I have black paper for matting...

I like that you can still see the tab bits of the dictionary page. Now I wish I'd used the actual letter tab page. Next time.
Now I don't know what to do with them. I need to take something down to put them up. But my point is proven - you don't need money to have fun stuff! (ok, you need printer ink, but surely you already have that, right?)

What I learned: When printing, it's easiest to treat the dictionary page as a letter sized sheet of paper and center everything - from your picture in the program you're using to the dictionary page in the tray. PRACTICE WITH PLAIN PAPER!!

Time Requirement: I finished all three of these in 30 minutes once I figured out the centering of the paper (which took my 2 failed attempts + 2 more and 15 frustrating minutes).

Materials Requirements: Book pages that won't bleed when you tear them out, picture manipulating computer program, printer, frame (optional)

Skill Requirements: Photo program computer and printer skills

ARE YOU PINSPIRED? 
This was SO easy that I'm not going to feel bad putting them 
back in the frame box when I can't find a place for them. 


Quoting Pinterest: California Rock

I love all the quotes on Pinterest and the interesting ways people are using them. The Pinspiration quote in this post is on my super top secret hidden board on Pinterest. That is because my best friend moved to California 2 years ago and I knew this would have to go on something for her. I worked it out...

The Pinspiration:

Not sure if this is the original source...Thank you, chalk genious - whoever you are.

I want to say I found this rock while on a great hike here in my gorgeous state of Colorado, but I probably got it from participating in the rock relocation program. (I'm sure you've heard of it. My bank participates. So does the grocery store. Any place, really, that puts those free rocks by where I park my car. If there is a heart-shaped one, it must be relocated to my house.) It was the perfect size for the saying I wanted to use.

My 'California' Rock: 


Well, now it's Sonya's California Rock. That's her blue carpet, too. Hi Sonya!

To make this amazing creation, I wrote on the rock with paint pens and then sealed it with a clear spray paint. Way too easy. So then I wrote over it again in different colors, effectively blurring it a little. Someday I will learn when to stop. :)

Time Requirements: 5-60 Minutes, depending on your stop-ability.

Materials Requirements: A great quote, whatever you want to paint/type/write/etc. on, and whatever you want to paint/type/write/etc. with.

Skill Requirements: Absolutely no skill is needed for this project. I'm so freaking proud of myself right now.

Have you copied a great quote? ARE YOU PINSPIRED?
Show me what you've made!!


Pinteresting Stuffed Owls


If you read my Owl Handwarmers post, you'll remember I mentioned an obsession.  I made these for every child in my life. My mother in law got one that represented each member of our family (7 owls in total). See below:

The Pinspiration:

Owl handwarmers from this blog post.
Idea borrowed from this etsy store.

My funny owls made with tons of love
and only a little blood:


Again, I didn't take enough pictures...I will add them as I find them.

For my sweet daughter.

These were for my mother-in-law for Christmas last year. There is one for each member of our family. I'm especially proud of the Air Force logo on the hat my brother-in-law never takes off:


Time Requirement: I'd give it a couple of hours at least for your first one. REMEMBER: SEW THE FACE ON FIRST!!

Materials Required: Fabric, Sewing Machine, Buttons (optional)

Skills Required: Template Making (don't forget your seam allowance - especially in the ear area!) Sewing, Hand Sewing

Have you made an owl? LET ME SEE IT!!


Pinteresting Owl Hand Warmers


The Pinspiration:
The talented gal that made the pinspiration owls sells them on etsy here. Thank you, LilyRoseCraft!

My Version of the Owl Handwarmers:

Just received an email from my mom with this picture:


You can see they have been well loved and used often - AND THE FACES ARE STILL THERE!! It can be done!

Several friends and family members recieved these as Christmas gifts. Of course, I didn't photograph each one before wrapping it. But I did include this little card with each one (photo also 'borrowed' from lily rose's etsy page.)


I really got into owls after this project! Check out my other owl post.

Time Required: I got it down to about an hour a pair. The first one took too long to mention. Yours won't take that long. You will put the face on first, right?

Materials Required: Fabric, Sewing Machine (unless you want to hand sew them), rice to fill them (NOT INSTANT!), needle and thread to close.

Skills Required: Template Making (don't forget your seam allowance), Sewing

Pinteresting Bottle Cap Table

The Pinspiration:


My Version of the Bottle Cap Mosaic Table


After caulking all these bottle caps into place, 
my elbow quit this project. I had to grout left handed.


Time Required: This project took me about 20 hours to complete. It is safe to say I won't be making another one without a serious down payment. :)

Skills Required: designing, caulking, grouting, miter-cutting

Have you been PINSPIRED? I'd love to see your bottle cap creation!